Inspire Me DIY: Grow Your Own Herbs in a Can


FullSizeRender (6)

Happy Monday friends!

If you follow me on Instagram (@colletteosuna) you already know that myself & nine other bloggers (<—–crazy talented by the way)
are participating in an Inspire Me DIY challenge hosted by the super sweet Kennesha of Restoration House.

Kennesha challenged us to show you how we Do it Yourself & hopefully inspire YOU to cross some projects off your own “to do lists”.
We want you to love your home right where it is, but with a little DIY upgrading.
Everyone has been hard at work on our projects, and today is the big reveal day!

Be sure to check out the other blogger links at the bottom of this post to peek at what they have been up to, & search the hashtag #inspiremediy to follow along for great inspiration on Instagram.

We can’t wait to see what YOU do!


FullSizeRender (4)

I had a few DIY ideas that I considered for this challenge & finally decided on these fun “grow your own herbs in a can”.
The main reason being that I already had everything in my home to complete this project except the actual herbs, (I bet you do too) and of course they are super cute!
IMG_9216arrow

The  inspiration for my DIY project came from these herb cans that I’ve walked by a gazillion times at Michaels’. I’ve seen photos of the store version flying around Instagram by others who love them as much as I do.
I thought they were adorable, but there was no way in you know where,  I was paying $14.99 for EACH can. They are super cute, but I just couldn’t see spending $45.00 on three cans of fake herbs.
I knew I could do a little better…..and for under $10.00, I was able to create my own knock off version with fresh herbs that I can use for cooking!


FullSizeRender (3)


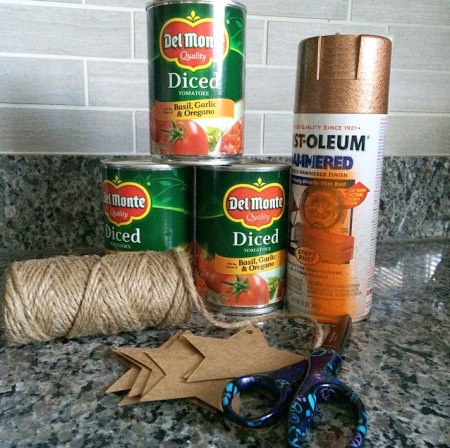
Supplies You Need:

Three tin cans from canned goods. I used tomatoes that I already had for .69 cents each

Spray paint in your choice of color. I used hammered copper paint that I got for FREE at Home Depot! My Home Depot store gives away free spray paint, you just have to ask if they have any at the paint counter. Very cool!

Twine (to thread the tag through and tie around the can)

Scissors

Cardboard stars (or any other shape). I picked up mine at Michaels’ for under $1.00 using a 40% off coupon

Black Sharpie (for writing  herb names on the tag)

Black construction paper (cut into 3″ strips to wrap around the can)

Clear Tape (to hold the black construction paper in place on the can)

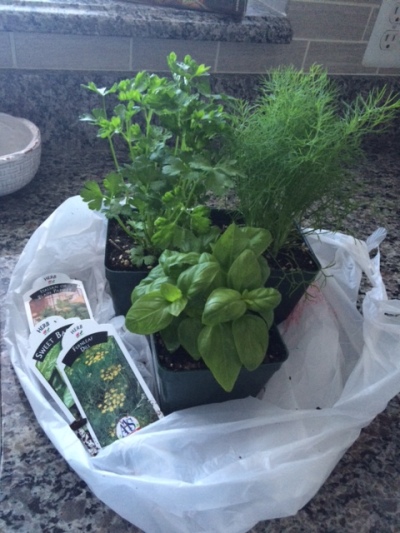
Three herbs of your choice (I used Dill, Parsley & Basil because we “rock out” these herbs at our house!)

IMG_9290

This super easy DIY starts off with choosing your can size. I used 14.5 ounce cans, but you can use larger cans, depending on the herb size you want to grow. I removed the labels from the cans, washed the insides thoroughly, & soaked off any remaining label glue in hot water.

I turned the cans upside down and gave them a quick coat of Rustoleum Hammered Copper spray paint. Remember to stand about a foot away from the cans using quick, even strokes. After the paint dried overnight, I flipped them right side up & applied another coat of spray paint, being sure to paint the very top of the can rim and about 1/4″ inside the can.

In order to give my cans a more “authentic look” of the Michaels’ version, I cut black construction paper into 3″ strips & wrapped it around the center of each can. Use clear tape to secure it to the back of the can.

I labeled my star tags using a black Sharpie marker & threaded each one through a cut piece of twine, about 24″ long.

Holding the tag on the front of the can, wrap the twine around two times, and finish off  with a bow.

IMG_9299

Finally, carefully remove your herbs from their containers & place gently inside each can.
I was able to find my herbs at a local garden center this weekend for the great price of $2.29 each!


FullSizeRender (5)

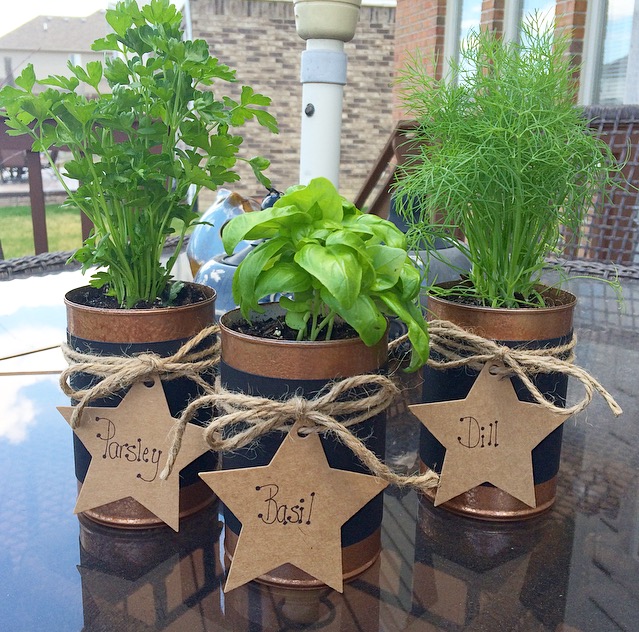
There you have it…..a super simple DIY that anyone can do!
I really love how my herb cans turned out & I can’t wait to start using the fresh herbs in my Summer grilling recipes!


Visit the links below to see my fellow bloggers reveal their #inspiremediy projects!
Restoration House
Thoughts From Alice
House Seven Blog
My Sweet Savannah
This That & Life
Ms. Craftberry Bush
Simple Stylings Blog
City Farmhouse Blog
Jen Migonis Home Blog


EDesigns: Olioboard Style


OB-snapshotPATIO1-2

If you’re a designer, or just a visual person who loves home decor, Olioboard will no doubt make your decorating days brighter! This program allows you to create Edesign boards/Moodboards by giving you a preview of a space before investing money in purchases. We all know that many times things just don’t look the way we envision them in our heads once we start placing them in a room.

As a designer who helps people with  home decor, Olioboard is my “go to” program to create many different room scenarios.
Best of all?……. its super easy to use and FREE!

PATIOOLIO

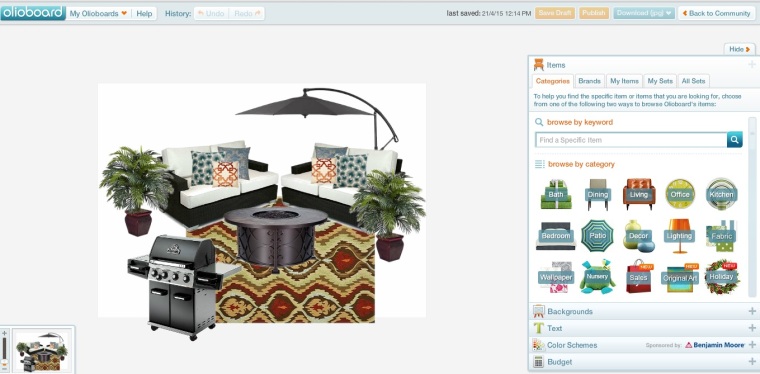
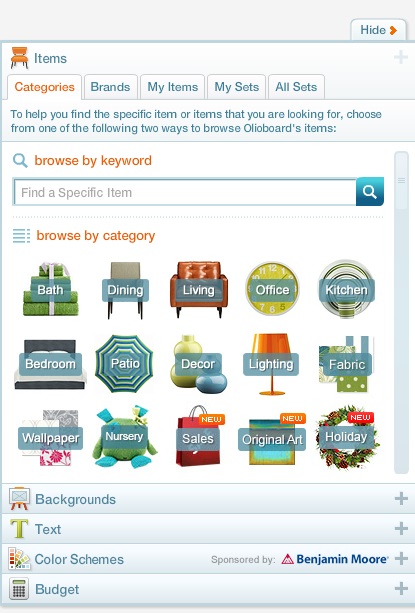
Talk about user friendly! Everything about the Olioboard program is pretty self explanatory with sub menus displayed on the right of the screen. You can browse by either category or brand and search for specific items by typing it into the search bar.

PATIOOLIO2

Standard free features of the program include thousands of product photos, backgrounds & your uploaded images saved under the “My Items” tab. For an additional $8.99 per month, the text & budget features are unlocked. I have not upgraded for the additional monthly fee because I add text to my EDesign boards by saving them as jpegs to my computer,  uploading the photo to Pic Monkey, adding text and resaving to my hard drive. It is an extra step, but not one I mind doing as it only takes a few extra minutes (and Pic Monkey is FREE too).

PATIOOLIO3

Do you have a specific room photo saved on your computer that you would like to redesign? No problem…click on the “My Items” tab at the right of the screen and the above pop up box will appear. Just search for your saved image on your computer and hit “upload the items”. Your uploaded images are automatically saved in the Olioboard program for you to use again and again.

IMG_9120

One of the first things I do when I visit a new clients home is to take many photos of each room which allows me a blank slate to create a new space. Having been a Polyvore user before discovering Olioboard, but not being able to use  photos from my own computer just wasn’t working for me anymore.

Having the ability to upload your images from your computer makes designing a room so much easier!  You can search and add decor items that are stored within the program itself, or upload additional photos from online stores that you love.

OB-snapshotedisonprints

OB-snapshotENGLISHPRINTS

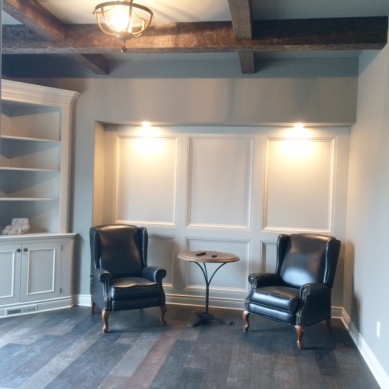
I knew I wanted to showcase this amazing wainscotting wall by adding prints that I found at Restoration Hardware. I saved two different print styles to my computer from the Restoration Hardware website, and with a few clicks of my mouse, I dragged them onto the room photo and was able to show the client exactly how both would look in his den.


If you are a faithful Polyvore user, give yourself a chance to explore Olioboard. I’m sure you’ll love it as much as I do!

The “Skinny” on Counter Tops

COUNTERTOP

Photos via Houzz & Joanna Gaines

I’m super excited to be meeting with a new client on Wednesday to discuss kitchen counter top options for his new build home. The kitchen is the heart of the home and choosing the right counter top is a huge decision. With so many choices, trendy & standard, how do you know which is best for the main focal point in your space?

Everyone has an instant design style they are attracted to, but before you shop for your dream counter top, be sure to check out the advantages (and not so great ones) that you might not know.
You could be saving yourself  alot of work & expense down the road.


QUARTZ

Quartz Counter Tops:
Advantages:
Contemporary feel which easily coordinates with most kitchen styles.
Because quartz is a manufactured product, you will find a large variety of colors.
Quartz does not need to be sealed and is very resistant to chipping and cracking easily.
Quartz is a non porous material which will stand up to stains such as juice, wine & coffee.

Disadvantages:
Pricey…….$80-$100 per square foot.
Quartz is not as heat resistant as granite, so you must use caution with hot pans on the surface.
The seams of manufactured quartz are sometimes noticeable.


TRAVERTINE


Travertine Counter Tops:
Advantages:
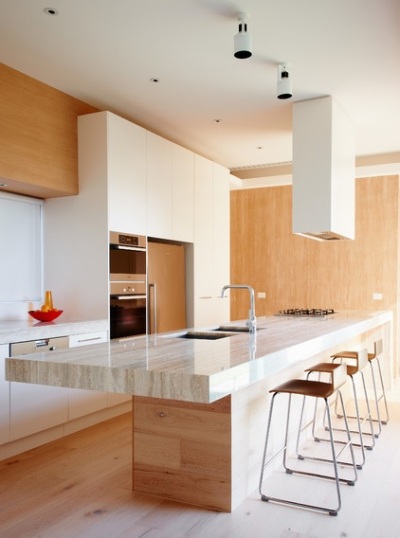
Travertine is a natural stone available in many colors & textures.
Perfect material for neutral kitchen decor.
Travertine reflects light complimenting existing glass & tile elements.
Because Travertine is a natural stone it will last many years.

Disadvantages:
Travertine can be easily damaged by direct heat.
Acid spills such as vinegar, juice & alcohol can easily damage the surface.
High maintenance; Travertine needs to be filled & sealed as it is porous and absorbs stains and food.


BUTCHERBLOCK

Butcher Block Counter Tops:
Advantages:
Warm, farmhouse look for your kitchen.
Perfect choice if you enjoy food preparation and baking.
Hides cuts & scratches.
Once properly sealed, wood counter tops are very sanitary.
Highly heat resistant.

Disadvantages:
Wood counter tops need to be properly sealed to avoid water damage that can warp the wood.
It is recommended that you oil the butcher block surface every 1-3 months with linseed oil.

CONCRETE

Concrete Counter Tops:
Advantages:
Strength! Concrete is very durable & strong & will not easily chip.
Highly customizable with various stains and stamping methods.
Concrete is very energy efficient & holds heat. It will store the heat in your home and release it when the temperature cools down.
Compliments many glass, tile & marble elements.

Disadvantages:
Needs to be sealed regularly for continued ease of cleaning.
Pricey…..$50 – $140 per square foot installed.
These counter tops are trendy now, but will they be in a few years?


Comforting Stuffed Peppers

Processed with VSCOcam with f2 preset


There’s something about frigid Michigan Winters that make me immediately want to cook comfort foods.  You know the ones, the dinners your Mom used to call “stick to your ribs” meals. I remember them as foods that warmed my belly, and they make me recall conversations around a dinner table (when families actually still ate together.)

This recipe for stuffed peppers is one of those comfort foods for my family. My daughter often requests meals, and this one is always on her list. It’s really fast & easy to make, and of course budget friendly. If you are a vegetarian like me, just substitute Morningstar Crumbles for the hamburger. It still states great!

I’ve been busy working on my Thanksgiving menu today, and it was great to know these yummy peppers were already baking in the oven and dinner was a rap for tonight.

I hope you are having a great night enjoying one of your favorite foods too!


Comforting Stuffed Peppers

6 green bell peppers
Salt to taste
1 pound ground beef
1/3 cup chopped onion
1 (14.5 ounce) can diced tomatoes
1 teaspoon Worcestershire sauce
1/2 cup uncooked rice
1/2 cup water
2 (10.75 ounce) cans tomato sauce
1 cup shredded mozzarella cheese
Bring a large pot of salted water to a boil. Cut the tops off the peppers, and remove the seeds. Cook peppers in boiling water for 5 minutes; drain. Sprinkle salt inside each pepper, and set aside.


In a large skillet, saute beef and onions for 5 minutes, or until beef is browned. Drain off excess fat, and season with salt and pepper. Stir in the tomatoes, rice, 1/2 cup water and Worcestershire sauce. Cover, and simmer for 15 minutes, or until rice is tender. Remove from heat.
 

Preheat the oven to 350 degrees F. Stuff each pepper with the beef and rice mixture, and place peppers open side up in a baking dish. In a medium bowl, combine tomato sauce with just enough water to make the soup a gravy consistency. Pour over the peppers.
 

Bake covered for 45 minutes, until heated through. Top each pepper with shredded mozzarella cheese and bake until cheese is thoroughly melted, about another 15 minutes.

Holiday Gifts From a Jar

Processed with VSCOcam with f2 preset


Hello Friends! Christmas is exploding at my house! I have been busy setting up all the Holiday decorations and trimming one of our trees. I usually put up five trees (yes, you read that right) so I need to get a move on before Thanksgiving!

I’m so excited to be hosting Thanksgiving at my home this year. It’s definitely a time to gather around with family & friends and reflect on all that you are truly thankful for.
That feeling of family to me, means sitting around the fireplace, eating great food, lots of hugs, and talking about old memories.

Some of the best memories I have as a Mother are my children’s homemade Christmas gifts. I actually have a Christmas tree  I set up in my kitchen that I call the “kids tree”. All of the treasures my kids have given me over the years are hung from that tree.
I remember growing up as a child that I HATED making homemade gifts and cards. I thought everyone really preferred a store bought gift.
How the tables turn. Once I became a Mother, I wanted those gifts made with love more than anything they could have purchased in a store.

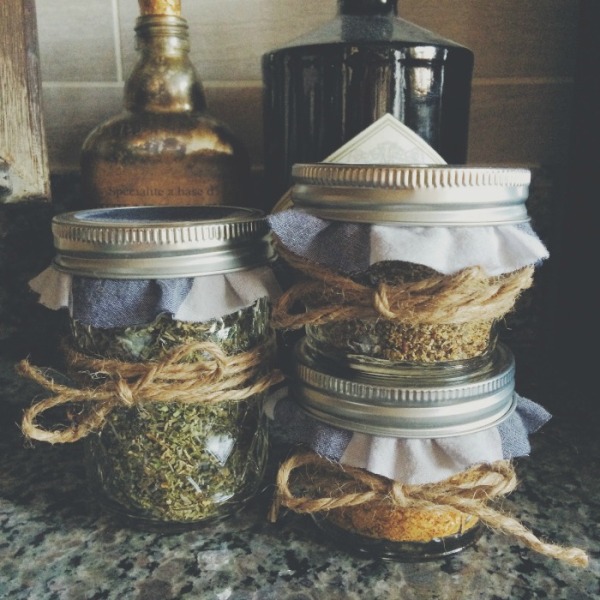
As an adult, I love to give and receive homemade Christmas gifts!   I purchased these little glass jelly jars from Michaels and thought putting together my favorite homemade spice mixes would make a thoughtful present!

Processed with VSCOcam with t1 preset

I filled the jelly jars mixing the spices from the recipes posted below, then found an old plaid shirt that I no longer wear. I used the top of a tin cookie can to trace around the shirt, making sure the circle was larger than the jar lid to allow a little overhang.

I cut the circle using sewing scissors, wrapped the jute twine around each bottle, and tied it in a bow knot.

This gift idea is so easy & fun using items you probably have around the house.

Let’s keep making those homemade gifts, because there’s nothing better than giving from your heart!


Herbs de Provence Ingredients

1/2 cup Thyme Leaf

1/4 cup Marjoram Leaf

2 tablespoons of cut and sifted Rosemary Leaf

2 tablespoons Savory

1 teaspoon of Lavender Flowers (lightly ground-optional)

2 teaspoons dried orange zest (optional)

1 teaspoon ground Fennel

Remove the zest of one  orange and dry in an oven on lowest setting or a dehydrator until completely dry. Place in a food processor with the lavender flowers and lightly pulse. Remove and mix all ingredients in a jar or bowl until mixed (do not grind up the herbs!)

I use this spice mix in soups, on chicken or on roasted vegetables.


Lemon Pepper Seasoning Ingredients

The zest from 4-6  lemons (or 1/2 cup pre-dried lemon zest)

6 Tablespoons ground black pepper (or whole peppercorns if you are using fresh lemon)

5 Tablespoons Himalayan Salt or Sea Salt

If using fresh lemon Zest, thoroughly zest the lemons and spread the fresh lemon out on a baking sheet. Put into the oven on the lowest setting and leave until completely dried, about an hour. When completely dried, mix with the peppercorns and salt in a food processor until well mixed. If making with pre-dried lemon peel, just mix all ingredients in a food processor until blended.

I use this spice mix on fish and LOVE to mix it into plain white rice.


Seasoned Salt Ingredients

2 Tbsp sea salt

1/4 cup Onion Powder

1/4 cup Garlic Powder

1/4 cup Black Pepper (ground)

2 tablespoons Chili Powder

3 tablespoons Paprika

2 tablespoons dried Parsley Leaf (optional)

1 tablespoon ground Red Pepper Flakes (optional)
Mix well by shaking in a jar or in a food processor. Store in airtight container.

I use this spice mix just about everywhere you would use regular salt when you want a little “extra” flavor.


Have Yourself a Rustic Kirklands Christmas

RUSTICKIRKLANDS700

Rustic Santa Shelf Sitter $16.99     Plush Frosty Owl $12.99    Winter Birch Tree $19.99    Rustic Christmas Plaques $15.99


It’s the most wonderful time of the year! The calendar turns November 1st and I have Christmas on the brain! Christmas has always been my most favorite Holiday & I can’t wait to start decorating & gift shopping!

Who has been stalking Pinterest  looking for new theme ideas for this year? I know I have, and a Rustic Christmas it will be!
I love the neutral colors of rustic wood and after all, nothing says “love” like burlap. I plan on adding some new items to things I already have around the house. Why not use burlap for a table runner? or add fir tree branches and pine cones to your Holiday centerpiece?

I’m a ride or die Kirklands fan, so I challenged myself to find items in their store that I’d love to decorate with this year.
The catch was that nothing could cost more than $19.99 each. I love owls like it’s my job, so of course I had to make sure I included one. I think he’s adorable!

This challenge goes to show you that Holiday decorating really doesn’t need to break the bank.

I definitely won!


Create a Free Holiday Printable With Pic Monkey

Processed with VSCOcam with t1 preset

Since I’m trying to hold off on “official” Christmas decorating for at least another week, I thought creating a few Holiday printables today might help me get my Christmas fix.

Printables for me are a fun and easy way to “fill in” some areas of my home by printing them out and displaying in frames. Most frames can be purchased at craft stores from $5.00-$10.00 depending on the style you choose.

Have you ever thought of making your own printable? It’s super easy, fast and free using Pic Monkey! I promise you, you do not have to be a computer wiz to use PicMonkey. You don’t even have to register for an account to use it. However, they are offering a free week of upgraded use if you do! By registering, you have access to overlays and fonts that normally there is an additional charge for, so I would definitely take advantage of that perk if you feel you will be using the program more often.

I have found the easiest way to start creating a printable is to use a plain white document. Since most of us do not have a full size white photo hanging around our computers, I have uploaded one for you here. Just  click on the link, and right click in the upper left hand side of the screen once the page opens. The document is white, so you won’t see an actual image. Download the blank document to your computer. Remember where you stored it because you will be uploading it to Pic Monkey to start your design.

2

Once you are on the Pic Monkey website, you will see this main page. Click on the edit button, which will open up another screen for you to search for your plain white photo.

3

Once your white document has been uploaded, your Pic Monkey screen should look like this. You will see tabs on the left hand side and you will want to click on the butterfly, which will open up overlays.

4
From here you can start designing your printable by opening the various shapes and designs. I chose a star for my Christmas tree. Just click on the shape you want to use, and it will appear on your blank document. Once the shape is on your page, you can drag the circles on the four corners to make the object larger or smaller, and even change the color by clicking on the color chart in the smaller left hand box that will automatically appear. How fun!

5
Once you have chosen the photos you want on your printable, it’s time to add some text. Using the tabs on the left hand side, you will want to clink on the “Tt” tab which brings up sooooo many different fonts to choose from! If you have a favorite font on your computer, you would click the “Yours” button on the left side which will bring up your computer stored fonts.  Click the “add text” box on the upper left and a text box will appear on your document. From there, you can again, change the font, color and text size.

6


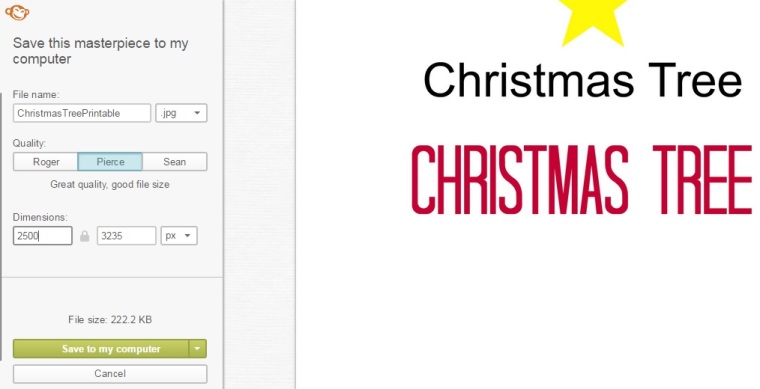
When you have finished your design and are ready to save it to your computer, you will see a “save” button right above your design. Once you click that, you will see the screen above. Rename your document if you choose and you MUST re-size it to 2500 x 3235 for best printing quality. Once you have that completed, just click the “save to my computer” button, and you are done!


XmasPrintablegreen500frame

I love making my own printables because the possibilities are endless. Choose your favorite flower, your favorite animal or even use family photos! You can print them out in 8×10, 5×7, gift cards, and change them up by season or Holiday.
Fast, free & fun!
If you like the Christmas Tree printable I created above, please feel free to download it from here.
Save the file to your computer, and print away in the size you choose!


If you decide to create your own printable and have questions, please reach out to me. I’d be happy to help.


Made From Scratch Brownies

Processed with VSCOcam with t1 preset

Ooey, gooey made from scratch brownies anyone?

Who doesn’t love the wafting smell of  baking brownies filling up your house? Did you know that even the faintest smells can trigger memories from years ago?

Thankfully, I have so many wonderful ones of baking & cooking with my Mother as a child. She passed on when I was 15 years old, so I hold onto those pretty tightly.
I’m so happy that my daughter and I can do the same. She may be turning 22 years old in a few days, but never too old to crack eggs with Mom.

I do it. You do it. We all do it……..use the box brownie mix from the grocery store. Why not?  It’s fast and everything you need is right there in the box.  This recipe is homemade, so why not use real ingredients when you can if it’s just as easy?
The only thing I didn’t have on hand was the cocoa.

Whoa, What a difference. I believe the cocoa powder is responsible for their awesomeness!

Bake & enjoy!


Makes 16 brownies:

1/2 cup butter
1 cup white sugar
2 eggs
1 tsp vanilla extract
1/3 cup unsweetened cocoa powder
1/2 cup flour
1/4 tsp salt
1/4 tsp baking powder

Preheat oven to 350 degrees. Grease & flour 8×8″ pan.
In a large saucepan, melt 1/2 cup butter. Remove from heat & stir in sugar, eggs & 1 tsp vanilla.
Beat in 1/3 cup cocoa, 1/2 cup flour, salt & baking powder.
Spread batter into prepared pan.
Bake at 350 for 30 minutes. Do not overcook.
Allow brownies to cool completely & dust with powdered sugar.

DIY Christmas Reindeer Pillow

Processed with VSCOcam with t1 preset

Hello friends, so nice to see you here! Welcome to my new blog, Through the Front Door.

I have been hard at work creating each section and  hope you love it as much as I do.
I’m so excited to be able to share with you my first DIY blog post.  I have been previously posting long project instructions and recipes through Instagram, so this is such a nice change, Yay!

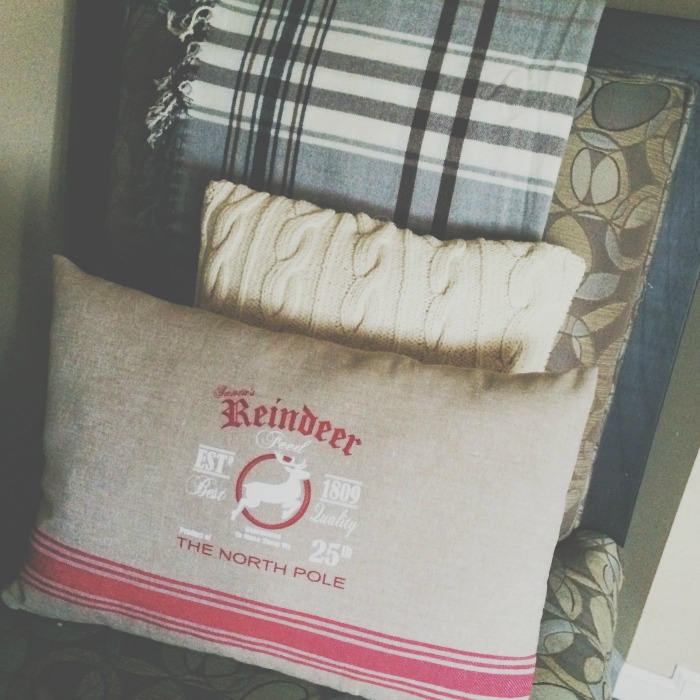
The shopping angels were with me yesterday when I found this cute Christmas reindeer towel set at Home Goods for only $4.99! Thankfully they had plenty in stock so I didn’t have to sweet talk someone into “giving it up”.  If you have been following me on Instagram, you already know that I typically see another  customer put the last item of what I want into their cart, then I stalk them around the store to see if they put it back. If they do?  I snatch it!

FOX

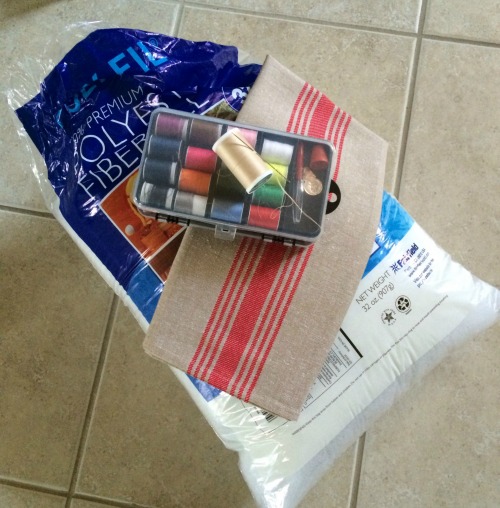
Anyways, getting back to the pillow, I have made Christmas pillows in the past using kitchen towels, but the towels have always been on the smaller side making it a royal pain in the “you know what”. These towels at Home Goods are huge friends! Just one towel makes your complete finished pillow. All you need is the towel (of course), pillow stuffing, straight pins, a sewing needle and thread.
NO, I did not say a sewing MACHINE……this DIY is so simple, no need to drag out that bulky thing.
Be like your Mom and hand sew it baby!

PILLOWFILLING500

Turn the towel inside out (right sides together) and fold it in half. Line up the towel ends on all three sides and insert straight pins to hold the edges together while you sew. Using a simple over stitch, sew your way around the three sides of the pillow leaving about six inches open at the last end. You will need to do this to insert the pillow stuffing.

TOWEL500

OVERSTITCH


Here’s an example of an over stitch. You know you were on your way to Google it !


Turn the pillow right side out & begin stuffing! Once you have have fully stuffed your pillow, tack stitch the opening shut. Easey peasey!  And don’t forget, you have another towel in the set which will make a perfectly matching pillow.

Seriously, this entire pillow project took me less than an episode of How to Get Away With Murder. <————Have you seen this show? OhMGee…..to say I’m obsessed with it would be an understatement.

So run out to your nearest Home Goods, pick up your towels, and get to sewing!